
First of all I got an award!! The Liebster Award from Lipgloss Lily - It's a blog award for new bloggers to find other new bloggers etc. I will be sharing the award in tomorrows post! Moving on to today's post...
It's Wednesday a.k.a Hump Day so I thought I would brighten your evening by sharing what I learnt at a 3 hour beauty masterclass I attended on Sunday. Get a comfy seat this post is a long one!
The class was held off Brick Lane, was very informative and I left with a well made up face (Thanks to my MUA RJ)
The class was hosted by Natasha Zaki who has worked London Fashion Week, TV Award Ceremonies and many make up counters! She taught us how to apply a base, contour the skin, then how to create a smokey eye look and her favourite products. So to make this really easy to follow and understand I have broken it up in to the steps we took.
Step 1: Use a good moisturiser as that is what 'makes' your skin. Always use a moisturiser before applying your foundation and work it into the skin using your fingertips to get into the dry areas of your face.
Tip: If you have a oily t-zone use an oil control lotion or a primer.
Step 2: Apply foundation to your forehead, cheeks,nose and lips (We used it on our lips as we were going for a neutral look). Then blend, blend, blend. Using a foundation brush blend the foundation in different directions as this is what prevents lines. We used MAC Studio Sculpt which left the skin with a dewy look. I fell in love with it, it's so much better than Studio Fix Fluid. It felt very light on the skin, like it was barely there and did exactly what it says on the tin- left the skin looking natural and dewy.

Step 3: Apply concealer under the eye area. In the class we used MAC Studio Finish concealer we placed it on the inner eye and under the eye to finish the base. I personally don't rate Studio Finish as it creases under my eyes. Anyone have any good concealer recommendations?
Step 4: We then used a highlighter to accentuate the skin. We used Nars Cocomama Shine Stick and applied with our fingers down the nose, forhead, cupids bow, and created a C around the outer eye. Like most NARS products the shine stick is amazing and suttle at the same time. Very easy to apply without wasting lots of product. It's better to use your finger to apply a highlighter as it warms the product helping it to go on to your skin and a brush just doesn't do the same thing.
Now on to the contouring
Step 5: We applied a MAC Mineralize powder UNDER the cheek bone, down the side of the nose and along the forehead. The key here is again to blend, blend, blend.
Step 6: Next was the blusher - We used MAC Mineral Blusher in Warm Sol to the apple of the cheeks and blended well.

Step 7: Now it was time to create the perfect smokey eye. I'm going to bullet point how we did this to make it easier for you to follow/ read! We used a Eye cature herbal eye liner as they are easy to manipulate,move and layer. As it's herbal it is actually 'healthier' for your waterline.
- So we applied the Eyeliner to the waterline.
- We next scribbled the eyeliner over our eye lids and blended it out with a thick brush but concentrating on the lash line area. Making sure all edges are flattened out to soften the socket line.
- We then used a sparkly dark grey to press in to the eyeliner area. This created more depth and helps the eyeshadow to stay on for longer. We used circular motion which helps it all blend together.
- Using an angled brush we pressed the same eye shadow under the waterline and joined it with the upper lash line to create the 'smoke' in smokey eyes.
- Lastly, we used Screenface Fardel Fluid. Which is a runny black liner on the top lash line. Followed by Opulash volumising mascara.
Step 8: The last step for this look was filling in the eyebrows, a touch of lipgloss and VOILA...You have smokey eyes!
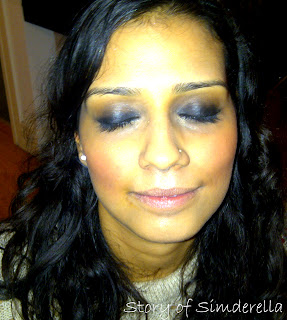


It was a great experience and I will defo be attending more of Natasha's classes along with my BFF. Although everything mentioned above may be obvious it is the little things like placing the importance on blending that counts. I know in the morning before work no one has the patience to sit there blending make up but it really does make a difference!
P.S Be nice to my face it's the first time it's been revealed on le blog!
P.S Be nice to my face it's the first time it's been revealed on le blog!
Have you ever been to a make up master-class?
No comments:
Post a Comment